Coconut Milk Yogurt
 We used eat yogurt by the bucketful. Literally. A four pound container would last about week in our house.
Zevin could eat his weight in yogurt (not literally). We used to feed him tons (again, not literally) partly because he loved it and partly because it seemed like such a wholesome food choice. The yogurt we gave him was full of healthy probiotics, after all, and Zevin’s gut needed all the help it could get.
Turned out, that Zevin is allergic to dairy. Oh, sad boy! He loved (loves) yogurt.
For a while he forgot about yogurt, but his preschool offers it as one of their family style snacks and Zevin’s started asking for it again. I stock a snack stash at school for days when he can’t eat what the school provides. I used to try to match it so if they served regular crackers, Zevin could have his allergen-free crackers; if they had regular cereal with milkm Zevin could have allergen-free cereal and non-dairy milk. But yogurt, well, I just couldn’t match that one.
We tried a few non-dairy substitutes, but none were particularly great in taste or texture, and every single non-dairy yogurt contained gums of some sort and most have added sugar. I might’ve occasionally bent my rules about whole ingredients and no added sugar so that Zevin could enjoy a yogurt at school on days that they served yogurt, but guar and xanthan can both be derived from corn. And yep, he’s allergic to corn.
Arrgh, what to do? My son is such a good sport about his food allergies, but this yogurt thing was getting him down.
I thought about coconut milk yogurt but we eat so much coconut already – coconut flour, dried coconut and coconut milk – that I wanted to go a different route. And I wanted protein in the yogurt. Nut milks are often used for dairy-free yogurt, but Zevin’s preschool is nut-free so nuts were out. Then I wondered about seeds. I have substituted sunflower seed butter (sunbutter) for nut butter in recipes before. Perhaps seeds would work.
After hours (days!) of research I discovered that most seeds lack the fat content necessary for making yogurt. I did find a single recipe for making sunflower yogurt out of homemade sunflower seed milk, but after three unsuccessful attempts resulting in watery (though tasty) yogurt, I abandoned the recipe.
So back to coconut milk yogurt. It doesn’t rate high for protein, but it does have healthy fats and, as a fermented food, it offers wonderful probiotics. Best of all, Zevin can sit elbow to elbow with his friends at the snack table enjoying (almost) the same thing.
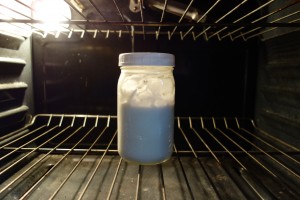
 To make sure I wasn’t going to kill anyone with this yogurt, I consulted Cultures For Health. They have a nifty table with easy, straight forward, step-by-step instructions for making yogurt. I followed the last column, ‘Direct-Set Starter with Alternative Milk’, but skipped the part about heating the milk. I know we’ll likely drizzle a little honey or serve the yogurt with fruit, so I didn’t add sugar. We like tangy yogurt so I waited 24 hours before taking mine out of the oven.
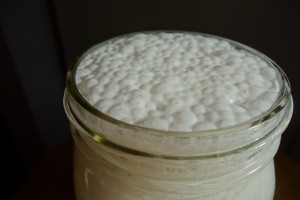
After the fermentation was done, I opened the lid and stirred the milk, which had separated. It bubbled up to the top of the jar and eventually settled back down. I put the lid back on and placed it in the fridge to thicken up. The next day I gave it a taste test and was pleased with the taste. The coconut milk that I used isn’t 100 percent creamy; it’s got small pieces of coconut in it, but we’re ok with that.
The yogurt got two thumbs up from Zevin. He asked for it to be less tangy next time, but that’s an easy fix. I think I’ll add vanilla to the rest of the batch, too, just to round out the flavors. His first bowl was drizzled with honey and happily gobbled up in minutes. Next Monday, yogurt is on the school’s snack calendar, and guess who’s going to be joining the the table? That’s right, a very happy boy.
Some notes before making this ridiculously easy, 2-ingredient yogurt.
- The only BPA-free can of organic coconut milk free of gums that I’ve found is Natural Value
. If you don’t mind gums but do want organic & BPA-free, try Native Forest
.
- Use whole fat coconut milk.
- Refrigerate the can overnight to allow the cream to thicken & the water to settle at the bottom. Keep the can upright & don’t shake it before opening. Scoop the thick stuff off the top, use the water for something else (a smoothie, perhaps).
- Use a capsule of high quality probiotics or inner-ēco dairy-free probiotic (it’s a liquid).
RECIPE
- 2 cans coconut milk, full fat
- 2 probiotic capsules or 2 T liquid probiotic
- Glass jar with lid, sterilized (running through the dishwasher is fine)
DIRECTIONS
- Scoop the thick coconut milk into the jar, add probiotic, stir, close lid.
- Let sit for 24 hours in an oven with the light on (don’t turn the oven on!). Your yogurt requires a somewhat constant 108 – 11o degrees to do its thing.
- Another option is to put a heating pad on low inside of a cooler, wrap the jar in a kitchen towel (something thin verses a thick bath towel) and set the jar in the cooler. Close the cooler & let sit for 8 – 24 hours.
- When yogurt reaches desired tang, place in refrigerator for at least 6 hours.

This sounds so easy to make I just might try it. Keep up the good work I am learning a lot. Who says you can’t teach an old dog new tricks.
Easy and delicious!
Very interesting. Is goat milk an option? I know Port Madison farms used to sell yogurt and they still go to the Ballard Farmers Market.
After looking into a number of the blog posts on your site, I really appreciate your technique of
writing a blog. I book marked it to my bookmark webpage list
and will be checking back soon. Take a look at my web site too and tell me how you feel.